
想要小白详细版本的Github+Hexo+Next搭建博客教程,可访问我的另一篇博客使用Github+Hexo+Next免费搭建自己的博客(最细攻略)。
注意:以下非特殊说明路径都是基于你本地博客的根目录,效果主要基于hexo+next实现效果,大部分效果均可在我的博客中保留,可先睹为快,再决定是否需要
1.实现展示fork me on github效果
先上效果图:

这类效果图主要有两类样式,分别是显示fork me on github还有一个显示github图标的,可分别在第一种地址和第二种地址里面选择自己喜欢的款式,然后复制对应框中的代码。接着打开themes/next/layout/_layout.swig文件,将刚才复制的代码粘贴在<div class="headband"></div>代码下面,保持缩进与其对其,同时把herf后面对应的github地址换成你自己的。这里需要注意的是,目前复制的代码中新增了width和height参数,却没有了位置的参数。如下图所示,如果你想跟我一样只设置位置,大小默认,那么就可以删除width和height参数,并新增top,right,和border参数。想要测试在线效果的话,可用hexo s本地测试,或者hexo d -g线上测试。

2.添加动态背景
先看效果图:
注意:如果你是使用next主题并且版本在5.1.1以上,例如我自己就是,那么设置起来就极其简单,直接在主题配置文件中找到canvas_nest配置字段改成true即可:1
canvas_nest: true
那如果你符合next以及5.1.1版本的要求怎么办呢?不着急,我们通过一些配置文件的修改也能够达到目的。上述符合的话只需要打开开关的原因是以下这些配置都已经集合进去了。
修改_layout.swig
首先我们打开配置文件:/themes/next/layout/_layout.swig,然后在 < /body>之前添加代码(注意不要放在< /head>的后面):
1 | { % if theme.canvas_nest % } |
其中有几个配置参数解释一下:
1 | color: 线条的颜色,默认是 0,0,0 ,对应的是(R,G,B)参数; |
修改主题配置文件
我们打开主题配置文件:/themes/next/_config.yml,在里面添加以下代码,一版放在最后面即可:
1 | # -------------------------------------------------------------- |
然后就可以使用经典的三个不输命令来测试了,在gitbash中运行hexo clean和hexo g,以及hexo s可在本地测试,或者hexo d即可在线上进行展示效果。
3. 点击出现桃心效果
先看效果图:
首先打开目录:/themes/next/source/js/src/,之后在里面新建一个love.js的文件,文件里面复制进去以下内容:
1 | !function(e,t,a){function n(){c(".heart{width: 10px;height: 10px;position: fixed;background: #f00;transform: rotate(45deg);-webkit-transform: rotate(45deg);-moz-transform: rotate(45deg);}.heart:after,.heart:before{content: '';width: inherit;height: inherit;background: inherit;border-radius: 50%;-webkit-border-radius: 500%;-moz-border-radius: 50%;position: fixed;}.heart:after{top: -5px;}.heart:before{left: -5px;}"),o(),r()}function r(){for(var e=0;e<d.length;e++)d[e].alpha<=0?(t.body.removeChild(d[e].el),d.splice(e,1)):(d[e].y--,d[e].scale+=.004,d[e].alpha-=.013,d[e].el.style.cssText="left:"+d[e].x+"px;top:"+d[e].y+"px;opacity:"+d[e].alpha+";transform:scale("+d[e].scale+","+d[e].scale+") rotate(45deg);background:"+d[e].color+";z-index:99999");requestAnimationFrame(r)}function o(){var t="function"==typeof e.onclick&&e.onclick;e.onclick=function(e){t&&t(),i(e)} }function i(e){var a=t.createElement("div");a.className="heart",d.push({el:a,x:e.clientX-5,y:e.clientY-5,scale:1,alpha:1,color:s()}),t.body.appendChild(a)}function c(e){var a=t.createElement("style");a.type="text/css";try{a.appendChild(t.createTextNode(e))}catch(t){a.styleSheet.cssText=e}t.getElementsByTagName("head")[0].appendChild(a)}function s(){return"rgb("+~~(255*Math.random())+","+~~(255*Math.random())+","+~~(255*Math.random())+")"}var d=[];e.requestAnimationFrame=function(){return e.requestAnimationFrame||e.webkitRequestAnimationFrame||e.mozRequestAnimationFrame||e.oRequestAnimationFrame||e.msRequestAnimationFrame||function(e){setTimeout(e,1e3/60)} }(),n()}(window,document); |
接着打开配置文件/themes/next/layout/_layout.swig,在最后加上以下内容:
1 | <!-- 页面点击小红心 --> |
到此就完成了,可以部署测试一下效果。
4. 修改文章链接样式
先看效果图:
打开配置文件:themes/next/source/css/_common/components/post/post.styl,在最后面添加如下的代码来设置:
1 | // 文章内链接文本样式 |
其中.post-body是为了值效果不影响标题,而后面的p是为了起到不影响首页阅读原文的效果,color: #fc6423;是颜色的配置项,可以自定义。
5. 修改文章底部标签符号#
默认的文章底部显示的标签是以#来展示的,看上去蛮怪的,我们改成另一种样式,
我们打开模板配置文件:/themes/next/layout/_macro/post.swig,然后搜索rel="tag">#,将其中的#换成<i class="fa fa-tag"></i>,保存后部署即可。
6. 文章末尾添加“结束”标记
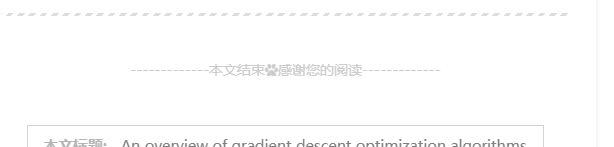
先看效果图:
首先打开文件夹:/themes/next/layout/_macro,然后在其中新建passage-end-tag.swig文件,并添加以下内容:
1 | <div> |
其中-------------本文结束和感谢您的阅读-------------两处可根据自己的喜好进行修改。
接着,打开配置文件:/themes/next/layout/_macro/post.swig,在END POST BODY和<footer class="post-footer">之间添加以下代码,一般就放在紧邻END POST BODY后面即可:
1 | <div> |
最后打开主题配置文件,在最后面添加以下代码即可:1
2
3# 文章末尾添加“本文结束”标记
passage_end_tag:
enabled: true
到这里就完成了,可以部署后看看线上的效果,每一篇文章都添加了。
7. 头像触碰旋转
先上效果图:
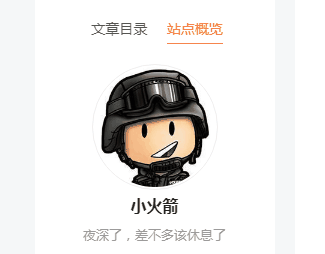
头像的配置这里不赘述了,可参考本文开头提到的另一篇博客。接下来为了实现触碰旋转,我们需要先打开配置文件:/themes/next/source/css/_common/components/sidebar/sidebar-author.styl,然后再最后添加如下一段代码:
1 | .site-author-image { |
8. 修改``代码块样式
先看效果图:

首先打开配置文件:/themes/next/source/css/_custom/custom.styl,如果对应路径下没有的话就新建一个,然后在里面添加以下代码:
1 | // Custom styles. |
9. 主页文章添加阴影效果
先看效果图:

紧接着上面的步骤,继续在配置文件/themes/next/source/css/_custom/custom.styl中最后面添加下面的代码即可:
1 | // 主页文章添加阴影效果 |
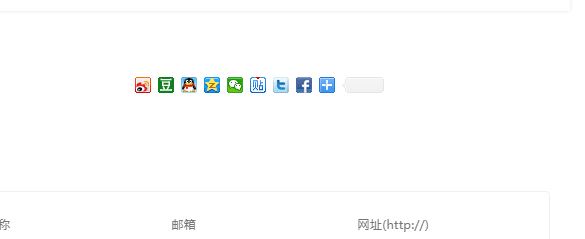
10. 侧栏社交连接
效果如下:
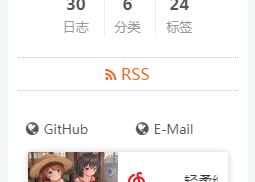
首先打开主题配置文件_config.yml,然后搜索social关键词,找到social和social_icons参数配置区域,可以看到如下的代码配置块:
1 | social: |
如上所示,social模块是配置各个社交连接项的,不需要的可以注释掉,也可以新增其他的社交项,名称也都没有限制,社交项对应的图标是使用fontawesome的icon图标的,可以在fontawesome图标官网找到你喜欢的。图标的配置可以在social模块中的对应链接后面使用||隔开配置,也可在下面的social_icons模块配置,不管怎样,最后记得要把social_icons模块中的enable设为true哦。
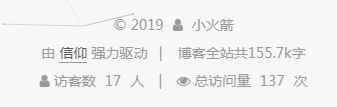
11. 站点底部和文章顶部显示访问量
先看看如下两个效果图:

使用next主题的好处在这里就体现出来了,配置这个很简单,只需要打开主题配置文件/theme/next/_config.yml后,搜索busuanzi找到如下配置代码块后进行相关配置即可:
1 | # Show PV/UV of the website/page with busuanzi. |
如上代码所示的是我本人的配置,主要分为三大块:
site_uv表示是否显示整个网站的UV数
site_pv表示是否显示整个网站的PV数
page_pv表示是否显示每个页面的PV数
需要的则把对应的开关配成true,另site_uv_header配置项中的文字是显示的名称,而site_pv_footer则是对应的统计单位。当然如果你是其他主题,也可配置,网上教程很多。到此就配置结束,可以使以部署测试效果,但是这里如果使用hexo s来测试,你会发现数字特别大,这是正常现象,因为不蒜子用户使用一个存储空间,所以你只要hexo d -g部署到线上进行测试就完毕了。
12. 网站底部字数统计
如上述第11部分效果图所示。
首先需要安装一个统计包,我们将控制台路径切到根目录或者在根目录调出git bash,然后运行如下代码:
1 | npm install hexo-wordcount --save |
接着打开配置文件/themes/next/layout/_partials/footer.swig,之后在最下面新增以下代码即可:
1 | <div class="theme-info"> |
13. 文章页面的统计功能
如上述第11部分效果图所示。
这一块的统计主要是对于每篇文章在头部显示字数和推荐阅读时长,配置方法与上述类似,现在根目录运行以下代码安装统计包:
1 | npm install hexo-wordcount --save |
紧接着在主题配置文件中搜索post_wordcount配置模块,并按照如下代码进行配置,如果没有的话直接新增也可以:
1 | # Post wordcount display settings |
14. 顶部加载进度条
先看效果图:

这个功能在next主题中配置起来又是如此的简单,只需要打开主题配置文件,之后搜搜pace找到如下的代码配置模块:
1 | # Progress bar in the top during page loading. |
将其中的pace项设为true即可打开进度条效果,其中pace_theme配置项是选择进度条效果,可选的配置项都列在了各个注释中,可以参考这篇文章看看不同进度条的展示效果,选择一个自己最喜欢的即可。
15. 添加README.md文件
我们在 Hexo 目录下的 source 根目录下添加一个 README.md 文件,修改站点配置文件 _config.yml,将 skip_render 参数的值设置为:skip_render: README.md即可。
这样再每次部署的时候就不会重新渲染README.md文件,否则每次都要修改对应的文件。
16. 修改网站图标
图标展示如下所示:
Hexo博客默认图标是一个六边形的黑色背景白色前景N的图案。如果你想要修改对应的图案或者从其他渠道也可以,可以去EasyIcon找到喜欢的图案下载,下载的时候有好几种大小,该如何选择呢。
我们可以进入/themes/next/source/images目录,并且同时打开主题配置文件,搜索favicon找到其如下的配置代码模块:
1 | # For example, you put your favicons into `hexo-site/source/images` directory. |
对比images文件夹里的文件,相比你就知道各种大小的 favicon 图案对应什么场景需求了,然后将你选择好的不同大小的图案替换现有的图案,保持名称和后缀一样就可以了。
16. 增加版权信息
先看效果图:
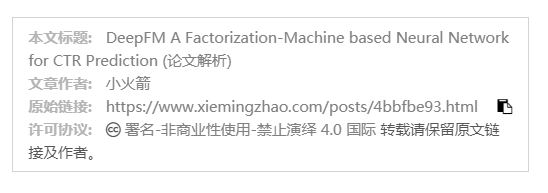
对文章添加版本信息也是对自己发布的内容的一种保护方式,也是为了减少别人引用时候的费力度,于人于己都是好事。我门首先打开目录:themes/next/layout/_macro/,然后新建一个文件my-copyright.swig,内容添加如下代码:
1 | { % if page.copyright % } |
可以看到代码中配置了主要会披露的几项内容:
1.本文标题
2.文章作者
3.发布时间
4.最后更新
5.原始链接
6.许可协议
根据你的需求选择去留就好,在我们设置里面剔除了发布时间和最后更新的披露。
接下来我们再打开目录:next/source/css/_common/components/post/,并在其中新建文件:my-post-copyright.styl,之后里面添加如下代码:
1 | .my_post_copyright { |
还没结束呢,我们还需要打开配置文件:/themes/next/layout/_macro/post.swig,搜索找到next/layout/_macro/post.swig所在的代码块,在其前面新增一段代码,最终结果如下所示:
1 | <div> |
要保持对其哦,然后就差最后一步了,打开配置文件:/themes/next/source/css/_common/components/post/post.styl,再最后新增一行如下的代码:
1 | @import "my-post-copyright" |
保存后部署即可。可能这时候你发现文章还是没有出现版权,那是因为还有一个很关键的因素,那就是你需要在你想添加版权的文章的头部增加copyright: true的配置项。例如本篇博文的配置汇总就有:
1 | --- |
如果不想每次手动添加,想要实现hexo new的时候就自动添加的话,也是可以的。还记得之前提过新建博客的配置模板文件吗?打开/scaffolds/post.md在其中添加copyright: true即可。
17. 隐藏或修改底部驱动/主题信息
默认的话底部一般会显示由 Hexo 强力驱动 | Next 主题之类的信息。如果你想要去掉或者删除,则可以打开配置文件/themes/next/layout/_partials/footer.swig/,之后找到如下两块代码:
1 | { % if theme.footer.powered % } |
简单看一下,第一部分包含powered-by关键词就知道是设置由 Hexo 强力驱动代码块,另一部分有关键词theme-info则是设置主题信息的。根据自己需要进行修改和删除即可。
18. 修改底部桃心标志
这个比较简单,打开文件:/themes/next/layout/_partials/footer.swig,找到以下代码:
1 | <span class="with-love"> |
其中<i class="fa fa-{ { theme.footer.icon } }"></i>就是这个图标的配置,同样的可以去icons图库找到自己喜欢的图标替换这里的配置即可。然鹅,我自己没有修改,是因为没找到比这个心更合适的,当然教程还是要写给大家的。
19. 文章加密访问
虽然博客主要是对外交流使用,但是有时候也可以用来记录自己的一些私密事情,这时候难免像有个只有自己能进去的一片天地。毕竟以前的qq空间还有加密功能呢。Hexo自然也少不了,下面我们就开始。
首先打开配置文件:/themes/next/layout/_partials/head.swig,在<meta name代码坐在模块和{ % if theme.pace % }所在代码块之间新增如下代码即可:
1 | <meta charset="UTF-8"/> |
同样的还需要主动触发的一步,也就是需要在你想要加密的文章头部添加password:xxxxxx配置项即可,后面的xxxxxx即是这篇文章的查看密码。
20. 添加分享功能
先看效果图:
Hexo可以给博客增加分享功能,这样就可以实现分享页面/图片以及文章了。有的人使用jiathis分享功能,直接在主题配置文件中找到这个模块,将其改为true即可,但是亲测好像不是特别好用。
这里介绍的是百度分享功能,简洁实用。首先打开站点配置文件,搜索baidushare关键词,如下配置打开分享功能:
1 | # Baidu Share |
但是在部署使用的时候可能会引发Warning: Baidu Share does not support https从而不可使用。不怕,博主hrwhisper发布了一个修复方案,我这里简介一下。
首先下载上面博文发布的static文件夹。下载后解压,将static文件夹保存在/themes/next/source文件夹下面。
最后打开文件:/themes/next/layout/_partials/share/baidushare.swig,将文件末尾的一行代码按如下提示进行修改:
1 | .src='http://bdimg.share.baidu.com/static/api/js/share.js?v=89860593.js?cdnversion='+~(-new Date()/36e5)]; |
修改完成后,重新部署就可以正常使用分享功能了。
21. 博文置顶
有时候我们想将某一篇文章置顶在首页。我们可以这么实现。修改 hero-generator-index 插件,把文件node_modules/hexo-generator-index/lib/generator.js 内的代码替换为:
1 | 'use strict'; |
之后,想要指定某篇文章置顶的时候,就可以在文章的头部配置top: 100,top值越大越靠前。其实就是文章优先按照top值进行降序排列,没有top值的或者top值相同的就按照文章时间进行降序排列。
22. 修改字体大小和鼠标样式
字体大小的修改,可以打开文件: /themes/next/source/css/ _variables/base.styl,将$font-size-base配置项改成你想要的大小即可,例如:
1 | $font-size-base =16px |
鼠标样式的修改则需要打开文件: /themes/next/source/css/_custom/custom.styl,然后在里面添加如下代码:
1 | // 鼠标样式 |
其中url 里面必须是 ico 图片,ico 图片可以上传到图床,生成对应外链添加到这里就好了。
23. 点击爆炸效果
在前我们介绍了如何实现点击出现心的效果,这里介绍一个更浮夸的效果,点击时候爆炸。配置方式差不多的,首先在目录: /themes/next/source/js/src 里面建一个叫 fireworks.js 的文件,添加如下代码:
1 | "use strict";function updateCoords(e){pointerX=(e.clientX||e.touches[0].clientX)-canvasEl.getBoundingClientRect().left,pointerY=e.clientY||e.touches[0].clientY-canvasEl.getBoundingClientRect().top}function setParticuleDirection(e){var t=anime.random(0,360)*Math.PI/180,a=anime.random(50,180),n=[-1,1][anime.random(0,1)]*a;return{x:e.x+n*Math.cos(t),y:e.y+n*Math.sin(t)} }function createParticule(e,t){var a={};return a.x=e,a.y=t,a.color=colors[anime.random(0,colors.length-1)],a.radius=anime.random(16,32),a.endPos=setParticuleDirection(a),a.draw=function(){ctx.beginPath(),ctx.arc(a.x,a.y,a.radius,0,2*Math.PI,!0),ctx.fillStyle=a.color,ctx.fill()},a}function createCircle(e,t){var a={};return a.x=e,a.y=t,a.color="#F00",a.radius=0.1,a.alpha=0.5,a.lineWidth=6,a.draw=function(){ctx.globalAlpha=a.alpha,ctx.beginPath(),ctx.arc(a.x,a.y,a.radius,0,2*Math.PI,!0),ctx.lineWidth=a.lineWidth,ctx.strokeStyle=a.color,ctx.stroke(),ctx.globalAlpha=1},a}function renderParticule(e){for(var t=0;t<e.animatables.length;t++){e.animatables[t].target.draw()} }function animateParticules(e,t){for(var a=createCircle(e,t),n=[],i=0;i<numberOfParticules;i++){n.push(createParticule(e,t))}anime.timeline().add({targets:n,x:function(e){return e.endPos.x},y:function(e){return e.endPos.y},radius:0.1,duration:anime.random(1200,1800),easing:"easeOutExpo",update:renderParticule}).add({targets:a,radius:anime.random(80,160),lineWidth:0,alpha:{value:0,easing:"linear",duration:anime.random(600,800)},duration:anime.random(1200,1800),easing:"easeOutExpo",update:renderParticule,offset:0})}function debounce(e,t){var a;return function(){var n=this,i=arguments;clearTimeout(a),a=setTimeout(function(){e.apply(n,i)},t)} }var canvasEl=document.querySelector(".fireworks");if(canvasEl){var ctx=canvasEl.getContext("2d"),numberOfParticules=30,pointerX=0,pointerY=0,tap="mousedown",colors=["#FF1461","#18FF92","#5A87FF","#FBF38C"],setCanvasSize=debounce(function(){canvasEl.width=2*window.innerWidth,canvasEl.height=2*window.innerHeight,canvasEl.style.width=window.innerWidth+"px",canvasEl.style.height=window.innerHeight+"px",canvasEl.getContext("2d").scale(2,2)},500),render=anime({duration:1/0,update:function(){ctx.clearRect(0,0,canvasEl.width,canvasEl.height)} });document.addEventListener(tap,function(e){"sidebar"!==e.target.id&&"toggle-sidebar"!==e.target.id&&"A"!==e.target.nodeName&&"IMG"!==e.target.nodeName&&(render.play(),updateCoords(e),animateParticules(pointerX,pointerY))},!1),setCanvasSize(),window.addEventListener("resize",setCanvasSize,!1)}"use strict";function updateCoords(e){pointerX=(e.clientX||e.touches[0].clientX)-canvasEl.getBoundingClientRect().left,pointerY=e.clientY||e.touches[0].clientY-canvasEl.getBoundingClientRect().top}function setParticuleDirection(e){var t=anime.random(0,360)*Math.PI/180,a=anime.random(50,180),n=[-1,1][anime.random(0,1)]*a;return{x:e.x+n*Math.cos(t),y:e.y+n*Math.sin(t)} }function createParticule(e,t){var a={};return a.x=e,a.y=t,a.color=colors[anime.random(0,colors.length-1)],a.radius=anime.random(16,32),a.endPos=setParticuleDirection(a),a.draw=function(){ctx.beginPath(),ctx.arc(a.x,a.y,a.radius,0,2*Math.PI,!0),ctx.fillStyle=a.color,ctx.fill()},a}function createCircle(e,t){var a={};return a.x=e,a.y=t,a.color="#F00",a.radius=0.1,a.alpha=0.5,a.lineWidth=6,a.draw=function(){ctx.globalAlpha=a.alpha,ctx.beginPath(),ctx.arc(a.x,a.y,a.radius,0,2*Math.PI,!0),ctx.lineWidth=a.lineWidth,ctx.strokeStyle=a.color,ctx.stroke(),ctx.globalAlpha=1},a}function renderParticule(e){for(var t=0;t<e.animatables.length;t++){e.animatables[t].target.draw()} }function animateParticules(e,t){for(var a=createCircle(e,t),n=[],i=0;i<numberOfParticules;i++){n.push(createParticule(e,t))}anime.timeline().add({targets:n,x:function(e){return e.endPos.x},y:function(e){return e.endPos.y},radius:0.1,duration:anime.random(1200,1800),easing:"easeOutExpo",update:renderParticule}).add({targets:a,radius:anime.random(80,160),lineWidth:0,alpha:{value:0,easing:"linear",duration:anime.random(600,800)},duration:anime.random(1200,1800),easing:"easeOutExpo",update:renderParticule,offset:0})}function debounce(e,t){var a;return function(){var n=this,i=arguments;clearTimeout(a),a=setTimeout(function(){e.apply(n,i)},t)} }var canvasEl=document.querySelector(".fireworks");if(canvasEl){var ctx=canvasEl.getContext("2d"),numberOfParticules=30,pointerX=0,pointerY=0,tap="mousedown",colors=["#FF1461","#18FF92","#5A87FF","#FBF38C"],setCanvasSize=debounce(function(){canvasEl.width=2*window.innerWidth,canvasEl.height=2*window.innerHeight,canvasEl.style.width=window.innerWidth+"px",canvasEl.style.height=window.innerHeight+"px",canvasEl.getContext("2d").scale(2,2)},500),render=anime({duration:1/0,update:function(){ctx.clearRect(0,0,canvasEl.width,canvasEl.height)} });document.addEventListener(tap,function(e){"sidebar"!==e.target.id&&"toggle-sidebar"!==e.target.id&&"A"!==e.target.nodeName&&"IMG"!==e.target.nodeName&&(render.play(),updateCoords(e),animateParticules(pointerX,pointerY))},!1),setCanvasSize(),window.addEventListener("resize",setCanvasSize,!1)}; |
紧接着,打开文件: /themes/next/layout/_layout.swig,在 </body>上面添加如下代码:
1 | { % if theme.fireworks % } |
最后进入主题配置文件,在里面最后按如下配置开启效果即可:
1 | # Fireworks |
然鹅,这里我再次没有选择,因为这个效果感觉很容易影响阅读,华而不实。
参考博文
hexo的next主题个性化教程:打造炫酷网站
Hexo NexT主题中添加百度分享功能